Linked Lists are one of many different kinds of data structures that are ubiquitous within programming. The basic premise is that a linked list consists of a grouping of elements, commonly called nodes. Each node consists of some data and a pointer that will point to the next node in the list except for the last node which doesn't point to anything. The first node in the list is the head and the last node is the tail.
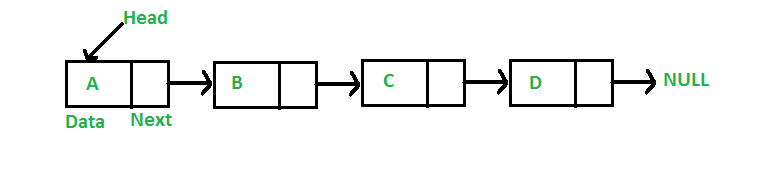
Above is an example of a singly linked list, meaning that each node only links the next node in the sequence. There are two other variations as well, the doubly linked list and the circularly linked list.
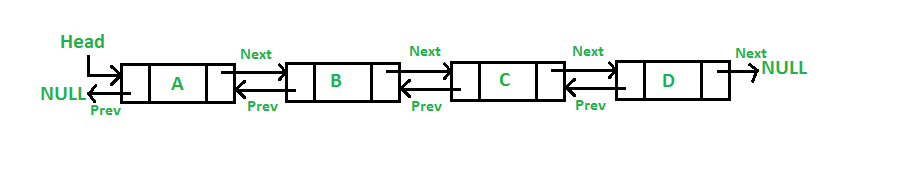
The doubly linked list, as the name implies, allows for each node to have two links. One pointing to the next node in the sequence, and the other pointing to the previous node in the sequence.
As anyone who has a little bit of programming experience would note, these look a lot like arrays. They are similar in that they're both linear data structures but there are significant differences as well.
Arrays are contiguous - each element is stored next to its sibling element in memory. Therefore, the array must be traversed every time something is inserted or deleted. Linked lists are held together by pointer which point to the memory location of the next node in the list. This makes it much more efficient to manipulate through insertion or deletion because you don't have to loop through to find the correct node/element.
Arrays are fixed in size - We have to know the maximum number of elements that might go into the array ahead of time. If the array doesn't end up holding all of those elements, the memory allocation will still be for the maximum size. So linked lists also have the advantage in only needing to take up memory for nodes used.
There are some downsides though. Linked lists might be more dynamic than arrays in terms of size and memory allocation, but each node must not only hold data but also save room in memory for the pointer. Also, we cannot use Random Access Memory to access pieces of a linked list, we must go sequentially through the list to find the item we need.
Alright, enough theory. Let's try to implement a singly linked list in JavaScript. Knowing what we know now, let's try to break this down into manageable pieces. Again, a linked list is a bunch of nodes that consist of data and a pointer. So, I'll start by creating something that can generate nodes for me.
class Node {

    constructor(data, pointer = null){

        this.data = data;

        this.pointer = pointer;

    };

};
In the code above, I created a class called Node. Using a class is important because it makes it easy to generate new nodes for the list. The constructor takes in whatever data it is passed as well as a pointer. If a pointer isn't designated, then a default value of null is used. From here, we can build another class that generates our actual list.
class LinkedList {

	constructor(){

		this.head = null;
	};
};
For the LinkedList class, the constructor won't take in any values. Instead, I'll set a default value for the head of null. When a list is created from this class, there won't be any nodes inside at first. Once we add one, it will be the value for this.head.
This is how you instantiate the LinkedList class and what it looks like once we log it to the console:
const myList = new LinkedList();

console.log(myList); //LinkedList { head: null }
Now that we have the list, we can start adding and removing nodes from it.
The best way to do this is by creating prototype methods on the class which we can then call in any subsequently created child objects.
Linkedlist.prototype.addFrontNode = ( value ) => {

    //create a node and assign it some value or data

    let node = new Node(value);

    //create a pointer and point it at the head
    node.pointer = this.head;

   //assign the head value to the node since we are inserting
   //it in the front of the list

   this.head = node;

   return this.head;
};
So that takes care of adding a node to the front of the list. We can now easily do so by calling the addFrontNode method on an instance of the LinkedList class. Here's how you would remove a node from the front as well:
LinkedList.prototype.removeFrontNode = ( value ) => {

    //check to make sure the node you are trying to remove is the first
    //in the list
    if(this.head === false) {
        return;
    };

    //reassigning head to the next item in the list
    //if there is one

    this.head = this.head.pointer;


    return this.head;

};
When removing a node from the front of the list, our method above checks to make sure that this.head has a value. This indicates that we are looking at the actual front of the Linked List. Then, we simply reassign the value of this.head to the next node in the list by using the pointer property on the head object. The pointer should already be pointing at the next item. If our pointer has a value of null, then we know that there are no more items in the list after the one we are deleting.